设计模式之观察者模式
本文共 6026 字,大约阅读时间需要 20 分钟。
模式定义:
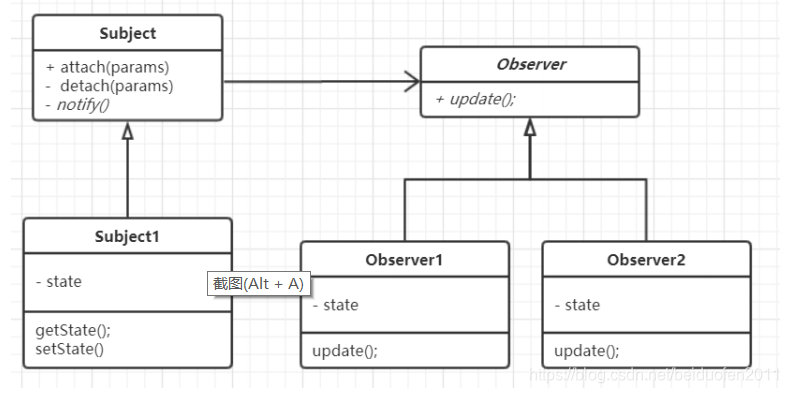
定义了对象之间的一对多依赖,让多个观察者对象同时监听某一个主题
对象,当主题对象发生变化时,它的所有依赖者都会收到通知并更新

应用场景:
当更改一个对象的状态可能需要更改其他对象,并且实际的对象集事先
未知或动态更改时,请使用观察者模式。
优点:
1.符合开闭原则
2. 可以在运行时建立对象之间的关系
JDK&Spring源码中的应用
1 JDK :
2 java . util . Observable
3 Spring :
4 org . springframework . context . ApplicationListener
public interface Subject { public void registerObserver(Observer o); public void removeObserver(Observer o); public void notifyObservers();} package com.fen.dou.sjms.observer;import java.util.ArrayList;/** *类是核心 *1. 包含最新的天气情况信息 *2. 含有 观察者集合,使用 ArrayList 管理 *3. 当数据有更新时,就主动的调用 ArrayList, 通知所有的(接入方)就看到最新的信息 *@author Administrator * */public class WeatherData implements Subject { private float temperatrue; private float pressure; private float humidity; //观察者集合 private ArrayList observers;//加入新的第三方 public WeatherData() { observers =new ArrayList (); } public float getTemperature() { return temperatrue; } public float getPressure() { return pressure; } public float getHumidity() { return humidity; } public void dataChange() { //调用 接入方的 update notifyObservers(); } //当数据有更新时,就调用 setData public void setData(float temperature, float pressure, float humidity) { this.temperatrue = temperature; this.pressure = pressure; this.humidity = humidity; //调用 dataChange, 将最新的信息 推送给 接入方 currentConditions dataChange(); } //注册一个观察者 @Override public void registerObserver(Observer o) { // TODO Auto-generated method stub observers.add(o); } //移除一个观察者 @Override public void removeObserver(Observer o) {// TODO Auto-generated method stub if(observers.contains(o)) { observers.remove(o); } //遍历所有的观察者,并通知 @Override public void notifyObservers() {// TODO Auto-generated method stub for(int i = 0; i < observers.size(); i++) { observers.get(i).update(this.temperatrue, this.pressure, this.humidity); } }} package com.fen.dou.sjms.observer;//观察者接口,有观察者来实现public interface Observer { public void update(float temperature, float pressure, float humidity);} package com.fen.dou.sjms.observer;public class BaiduSite implements Observer { // 温度,气压,湿度 private float temperature; private float pressure; private float humidity; // 更新 天气情况,是由 WeatherData 来调用,我使用推送模式 public void update(float temperature, float pressure, float humidity) { this.temperature = temperature; this.pressure = pressure; this.humidity = humidity; display(); } // 显 示 public void display() { System.out.println("===百度网站===="); System.out.println("***百度网站 气温 : " + temperature + "***"); System.out.println("***百度网站 气压: " + pressure + "***"); System.out.println("***百度网站 湿度: " + humidity + "***"); }} package com.fen.dou.sjms.observer;public class CurrentConditions implements Observer { // 温度,气压,湿度 private float temperature; private float pressure; private float humidity; // 更新 天气情况,是由 WeatherData 来调用,我使用推送模式 public void update(float temperature, float pressure, float humidity) { this.temperature = temperature; this.pressure = pressure; this.humidity = humidity; display(); } // 显 示 public void display() { System.out.println("***Today mTemperature: " + temperature + "***"); System.out.println("***Today mPressure: " + pressure + "***"); System.out.println("***Today mHumidity: " + humidity + "***"); }} package com.fen.dou.sjms.observer;public class Client { public static void main(String[] args) { // TODO Auto-generated method stub //创建一个 WeatherData WeatherData weatherData = new WeatherData(); //创建观察者 CurrentConditions currentConditions = new CurrentConditions(); BaiduSite baiduSite = new BaiduSite(); // 注 册 到 weatherData weatherData.registerObserver(currentConditions); weatherData.registerObserver(baiduSite); // 测 试 System.out.println("通知各个注册的观察者, 看看信息"); weatherData.setData(10f, 100f, 30.3f); weatherData.removeObserver(currentConditions); //测试System.out.println(); System.out.println("通知各个注册的观察者, 看看信息"); weatherData.setData(10f, 100f, 30.3f); }} org.springframework.context.ApplicationListener中的使用
public class MyEvent extends ApplicationContextEvent { public MyEvent(ApplicationContext source) { super(source); } public void out(String name) { System.out.println("MyEvent 事件执行了 name :"+name); }}
import org.springframework.context.ApplicationListener;public class MyListenerA implements ApplicationListener{ @Override public void onApplicationEvent(MyEvent event) { System.out.println("MyListenerA 执行了"); event.out("wangmingyuan not love"); }}
import org.springframework.context.ApplicationListener;public class MyListenerB implements ApplicationListener{ @Override public void onApplicationEvent(MyEvent event) { System.out.println("MyListenerB 执行了"); event.out("wangmingyuan not love"); }}
public class MyPublisher implements ApplicationContextAware { public ApplicationContext applicationContext; @Override public void setApplicationContext(ApplicationContext applicationContext) throws BeansException { this.applicationContext=applicationContext; } public void publisherEvent(ApplicationEvent event) { System.out.println("-----发送事件-----"+event); applicationContext.publishEvent(event); }}
@Import(value = {MyEvent.class,MyListenerA.class,MyListenerB.class,MyPublisher.class})public class EventTest { public static void main(String[] args) { AnnotationConfigApplicationContext context=new AnnotationConfigApplicationContext(EventTest.class); MyPublisher myPublisher = context.getBean(MyPublisher.class); MyEvent myEvent = context.getBean(MyEvent.class); myPublisher.publisherEvent(myEvent); }} 
转载地址:http://bwwrz.baihongyu.com/
你可能感兴趣的文章
No module named 'crispy_forms'等使用pycharm开发
查看>>
No module named cv2
查看>>
No module named tensorboard.main在安装tensorboardX的时候遇到的问题
查看>>
No module named ‘MySQLdb‘错误解决No module named ‘MySQLdb‘错误解决
查看>>
No new migrations found. Your system is up-to-date.
查看>>
No qualifying bean of type XXX found for dependency XXX.
查看>>
No qualifying bean of type ‘com.netflix.discovery.AbstractDiscoveryClientOptionalArgs<?>‘ available
查看>>
No resource identifier found for attribute 'srcCompat' in package的解决办法
查看>>
no session found for current thread
查看>>
No toolchains found in the NDK toolchains folder for ABI with prefix: mips64el-linux-android
查看>>
NO.23 ZenTaoPHP目录结构
查看>>
no1
查看>>
NO32 网络层次及OSI7层模型--TCP三次握手四次断开--子网划分
查看>>
NOAA(美国海洋和大气管理局)气象数据获取与POI点数据获取
查看>>
NoClassDefFoundError: org/springframework/boot/context/properties/ConfigurationBeanFactoryMetadata
查看>>
node exporter完整版
查看>>
Node JS: < 一> 初识Node JS
查看>>
Node JS: < 二> Node JS例子解析
查看>>
Node Sass does not yet support your current environment: Windows 64-bit with Unsupported runtime(72)
查看>>
Node 裁切图片的方法
查看>>